
Simple remote backup probe
Backups.
Nobody likes them, few people do them, and you really only start to appreciate them once you need them but don’t have them. I’ve set up a kind of dual-stage backup system for my computers and my home-server which is working fine so far. There surely is room for improvement and more redundancy but nevertheless, I thought it is might be worth sharing.
General Idea

I already run daily backups to my home-server via Back in Time. Back in Time is using rsync under the hood, provides a quite usable GUI and has the cool features, that the backups are real files and folders on the remote. But the fancy thing is, that you have separate folders for each backup, but they don’t multiply the memory need by using Hard-links internally.
What does that mean? Let’s imagine you have a file foo.txt which hasn’t changed between the backups. Back In Time would then create a folder for each backup and places the file inside. You’ll end up with something like 2022-01-20/foo.txt and 2022-01-21/foo.txt.
The clever thing is, both file tree entries actually point to the same bytes on your hard drive and only once consume the memory.
backups
├── 2022-01-20
│   ├── foo1.txt   <------+
│   └── foo2.txt          |
└── 2022-01-21            |
    ├── foo1.txt   <------+----- no changes - same file on disk
    └── foo2.txt   <---- had changes - new file on disk
I like doing it this way in my LAN, because file restoration is really simple: You just mount the remote file system, navigate to the file and copy-paste it back where you want it. The drawback is missing encryption (even though Back In Time supports this) and no compression.
But this setup was missing an offsite component so far to protect the data from any kind of “misfortune” like fire, lightning or a wild horde of rhinos (better be prepared for this!). Many people seem to use cloud storage for such an application, but I didn’t like the idea of giving my most sensible data into some company’s hand (even though encrypted). For this, I decided to use a different tool: Restic. It is a very advanced command line based backup tool which support numerous storage back-ends. One of the common applications is to back up your data to cloud storage. In comparison to the first tool, restic has its own data storage format, and you also need restic to restore the backups again. (Of course, both are open-source tools).
The Probe
What I wanted was a device which I can give to a friend and tell him: “Can you please plug this to your router? Thanks!” and everything run’s automatically. I had an Odroid-XU4 lying around for some time collecting dust, and it seems that this project is a good opportunity to put it to real use. With it’s USB3 port it was a better choice for a storage application than e.g., a Raspberry < 4.
Hardware
Besides the Odroid, I of course needed a disk, and the largest 2.5” one I could find back then was the “Seagate Barracuda ST5000LM000” with 5 TB. I also picked the shortest SATA-USB3 adapter cable I could find for a reasonable price.
It took me a few attempts to design the enclosure. I first tried something more compact, but then I’d end up with the HDD directly below the CPU, which was suboptimal. Also, the USB-SATA cable caused a lot of headache. But the final design is ok and I only need this once, so…
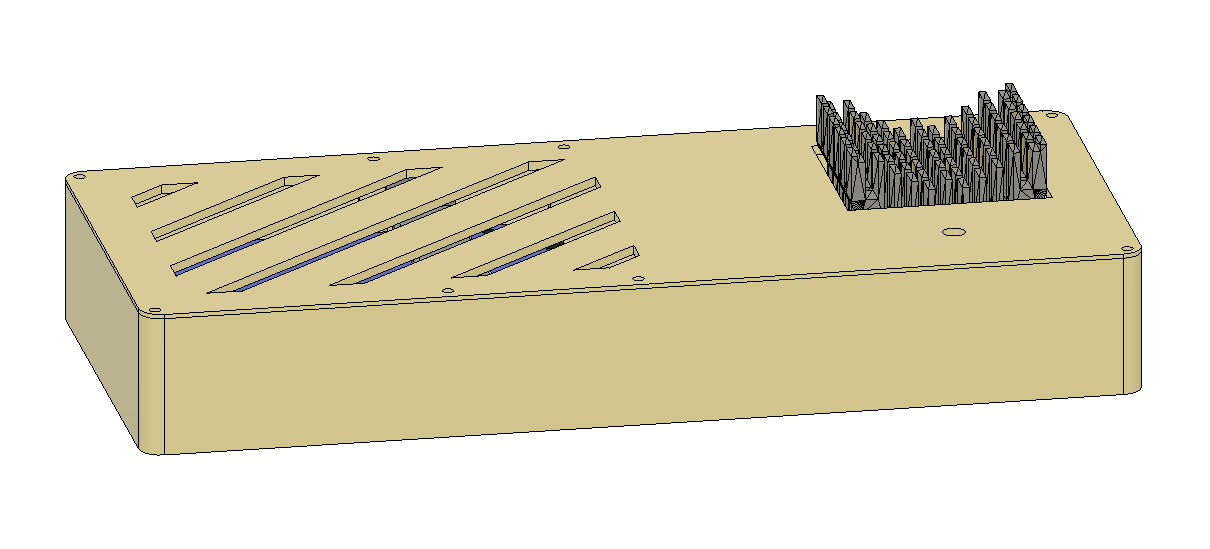
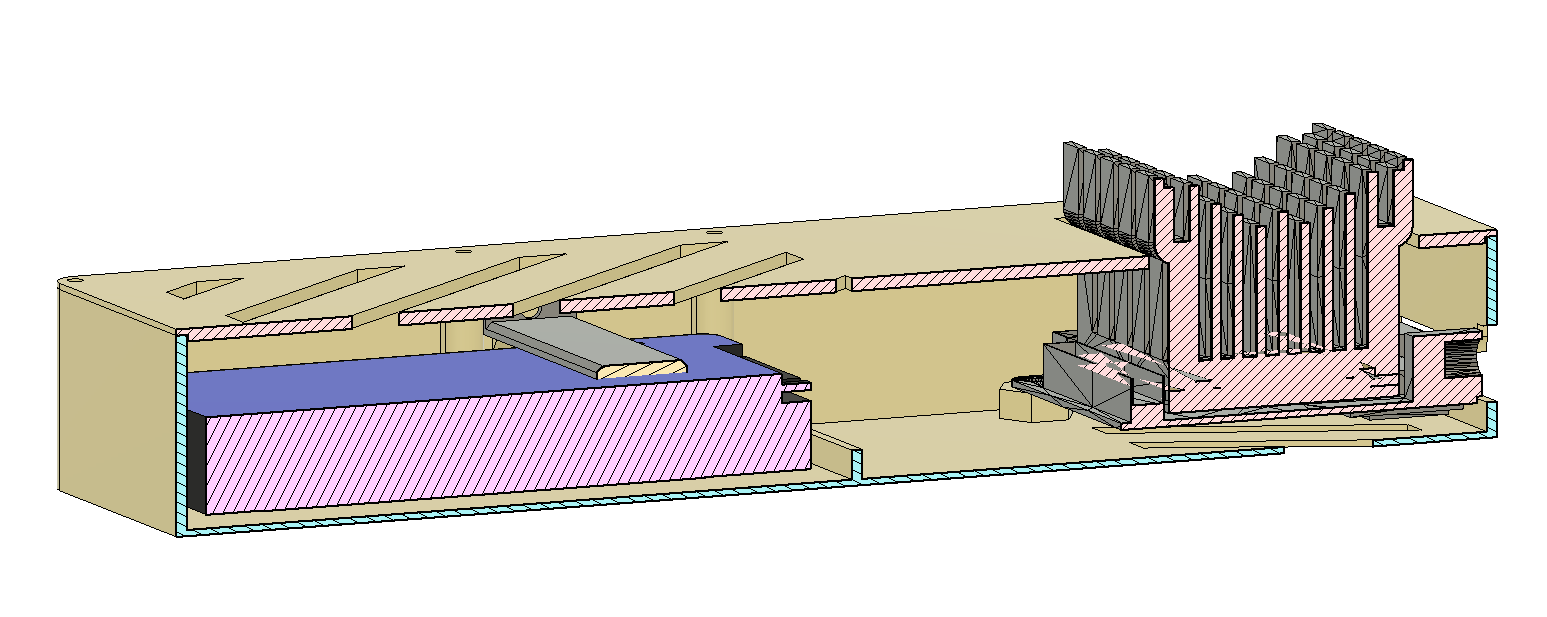
The HDD is located in a kind of pan, which I filled with silicone I had lying around. The small bracket you can see above the HDD keep it secured in the custom bed.

My original idea was to use some push rod mechanism for the Odroid’s button, but this didn’t work out (and I accidentally destroyed the button on the PCB), so instead I soldered the red button with some wires to the board, which worked fine.
Software
Disclaimer: It’s been a while since I set up the whole thing, so I couldn’t check all these commands upon writing again
So besides WireGuard, the probe isn’t really running any special software. The starting point is an Armbian-Focal (Ubuntu based) installation on that machine with ssh access and pubkey authentication. I assume that you are familiar with setting up such a system.
External Disk:
The external disk is configured with Btrfs. Of course, you can use different file systems, but I felt like this is the way to go.
To create the Btrfs partition on the disk (obviously, replace the aaaaa-bbb-… id with the one for your drive):
# create the mountpoint
> mkdir /data
# create the filesystem on the external disk
> mkfs.btrfs /dev/disk/by-uuid/aaaaaaaa-bbbb-cccc-dddd-eeeeeeeeeeee
To automatically mount the disk, the disk has to be added to to /etc/fstab as follows:
UUID=aaaaaaaa-bbbb-cccc-dddd-eeeeeeeeeeee /data btrfs defaults,compress,autodefrag,inode_cache 0 1
Now might be a good time for a reboot.
You can verify that everything worked with the following command:
> mount -l | grep /data
# should be like:
/dev/sda1 on /data type btrfs (rw,relatime,compress=zlib:3,...)
Unattended upgrades
As the probe won’t be maintained actively, it might be a good idea to enable unattended-upgrades. Unattended upgrades is already installed, we just have to enable it:
> sudo dpkg-reconfigure --priority=low unattended-upgrades
# ...
# Check if it worked:
> apt-config dump APT::Periodic::Unattended-Upgrade
APT::Periodic::Unattended-Upgrade "1";
Warning: beware that a power-outage during such an upgrade might render your installation useless. However, the backups *shouldn’t* be affected by this.
Power tweaking of the Odroid-XU4
The idle power use of a device running 24/7 is actually relevant. I measured the Odroid and it draws ~3.5W. A single watt you can save sums up to ~9 kWh over a year. It’s not that much but 2.5€ is at least something, especially if you give it away and let your friends pay the bill.
You can play around with the /sys filesystem and tweak the frequencies and governors of the system:
# Limit the frequency of the first 4 cores to 1GHz
> echo 1000000 > /sys/devices/system/cpu/cpu0/cpufreq/scaling_max_freq
# Disable CPUs 4-7
> echo 0 > /sys/devices/system/cpu/cpu4/online
I found, that the minimum frequency is set to 600 MHz, which can be reduced to 200 MHz with scaling_min_freq (check scaling_available_frequencies).
The changes made with the commands above are not persistent.
Multiple ways exist to make them persistent and I used the sysfsutils package and modified /etc/sysfs.conf:
devices/system/cpu/cpu0/cpufreq/scaling_governor = ondemand
devices/system/cpu/cpu0/cpufreq/scaling_min_freq = 200000
devices/system/cpu/cpu4/cpufreq/scaling_governor = ondemand
devices/system/cpu/cpu4/cpufreq/scaling_min_freq = 200000
You can also check the /boot/boot.ini to do more tweaks like clocking down the RAM.
WireGuard Server Setup
Ok, the Odroid is running for now and now we have to go back to the home-server and set up the WireGuard server. Not that I’m a Docker evangelist, but I found it actually pretty handy to use containers for the services on the home-server. So I also utilized it for the VPN and the backup routine, even though you surely can set it up without docker as well.
Please note: It is important that this machine is reachable from outside your network. Otherwise you’d need another server which is and acts as a VPN master.
So I’m using the linuxserver.io Dockerfile for this.
Basically I’m mostly copying their docker_compose.yaml.
I only adapted the SERVERURL to the one my home-server is using and of course made sure that the selected SERVERPORT port is reachable.
Running docker-compose up -d should be sufficient to start the server now!
If you take a look at the folder selected for the WireGuard config, you’ll see a number of folders peer1, peer2 … with predefined configs for the clients of the vpn - convenient, isn’t it?
WireGuard Client Setup
We now go back to the backup probe and install WireGuard:
> apt install wireguard
Easy! Now copy the content of one of the peerX.conf files mentioned before into /etc/wireguard/wg0.conf:
[Interface]
# The new wireguard IP of the probe
Address = 10.13.13.2
PrivateKey = XXXXXXXXX
ListenPort = 51820
DNS = 10.13.13.1

[Peer]
PublicKey = YYYYYYYYY
# My server's url
Endpoint = my.very-own.url.org:51820
AllowedIPs = 10.13.13.0/24
PersistentKeepalive = 25
Important: The PersistentKeepalive is required, as the Probe is most likely behind a NAT and thus not reachable from outside my friend’s home network.
With that parameter set, the probe sends a keepalive package to the server every 25 seconds, which keeps the connection open and enables us to ssh and backup anytime.
Verify that it works with:
> wg-quick up wg0
# ...
Now we check on the home-server or another machine in the same WireGuard network if this works:
> ping 10.13.13.2 # the IP set in the peerX.conf
PING 10.13.13.2 (10.13.13.2) 56(84) bytes of data.
64 bytes from 10.13.13.2: icmp_seq=1 ttl=63 time=59.1 ms
64 bytes from 10.13.13.2: icmp_seq=2 ttl=63 time=44.3 ms
# nice!

> ssh jonathan@10.13.13.2
# ...
At the moment, VPN connection is lost after a reboot. But this can be changed with systemd. We just have to enable the corresponding service:
> systemctl enable wg-quick@wg0
> systemctl start wg-quick@wg0 # (Otherwise a reboot is required)
Now is a good time to reboot the probe and check if the setup works so far.
DNS Issue Fix: If you address your host directly via an IP address, you can skip this step. But if you have set a DNS record for the server, you’ll probably run into an error here.
The problem is, that the WireGuard service now tries to establish a connection to the home-server before the DNS resolver is fully running. Therefore, the initial connection attempt fails, and the normal service configuration doesn’t include reconnects in such a case.
The dirty hack I did and which worked surprisingly well so far is, to wait for the domain to be reachable before the connection.
To do so, modify the systemd service file at /lib/systemd/system/wg-quick@.service and add the following line to the [Service] section:
ExecStartPre=/bin/bash -c 'until host my.very-own.url.org; do sleep 1; done'
Restic Setup
You could now install various cloud storage systems as back-ends on the probe, but the most simple one at this point and for this use case is probably SFTP/SSHFS. We use the Dockerfile provided by lobaro. However, with the plain Dockerfile, we would have to store the password for the probe in plaintext in the compose file, and it would also appear in the logs. So we extend the Dockerfile a bit and utilize Docker secrets to mount an ssh key in the container, so we can use passwordless authentication.
FROM lobaro/restic-backup-docker:latest
# secrets are mounted at /run/secrets. Here we link the secret into the container's ssh config:
RUN mkdir -p /root/.ssh && ln -s /run/secrets/user_ssh_key /root/.ssh/backup_probe_key
# Ensure correct permissions. SSH won't work if these are incorrect.
RUN chown -R root:root /root/.ssh
# Disable the "trust host message" in the container.
RUN printf "Host 10.13.13.2\n\tStrictHostKeyChecking no\n" >> /root/.ssh/config
If you haven’t done before, at the latest now we need an ssh key to log into the probe:
# (Optional:) Generate a new key:
> ssh-keygen -t ed25519 -C "your_email@example.com"
# Copy the key (here: backup_probe_key) to the probe:
> ssh-copy-id -i ~/.ssh/backup_probe_key -o PreferredAuthentications=password -o PubkeyAuthentication=no jonathan@10.13.13.2
Ok, now we are ready to tackle the restic configuration:
First we want to create a .env file to hold our backup’s password (the docker-compose.yml is really not the best place for these).
RESTIC_PASSWORD=asdfasdfasdf123412341234
Note: A handy way to generate passwords is pwgen: pwgen -n 30 1 generates a 30 character alphanumeric password.
Ok, now so here’s the section of the docker-compose.yml with the actual backup configuration:
---
version: "3.3"
services:
  restic-backup:
    depends_on:
      - wireguard
    container_name: restic-backup
    build:
      # use the local Dockerfile
      context: .
      dockerfile: Dockerfile
    secrets:
      - user_ssh_key
    environment:
      # repository location: /data/backup/server on the probe
      - RESTIC_REPOSITORY=sftp:jonathan@10.13.13.2:/data/backup/server
      # The name of the ssh key inside the container (not really necessary)
      - RESTIC_KEY_HINT=backup_probe_key
      # Every second day at 12:00
      - BACKUP_CRON= 0 12 2-30/2 * *
      # keep the last 2 backups plus one for the last 3 months.
      - RESTIC_FORGET_ARGS=--keep-last 2 --keep-monthly 3
    env_file:
      - .env
    volumes:
      # Backup the folders /zstorage/web and /home/jonathan
      - /zstorage/git:/data/git:ro
      - /home/jonathan/:/data/home:ro
      # ...
    restart: unless-stopped
    # Same network as the wireguard container so we can access the probe
    network_mode: service:wireguard

secrets:
  user_ssh_key:
    # create the secret for the ssh key (here: .ssh/backup_probe_key)
    file: /home/jonathan/.ssh/backup_probe_key
Note the addition of :ro in the volumes section to mount the folders as read-only. This ensures that anything wonky on your remote, backup configuration or in the wireguard network at least can’t change your files.
Final compose file
All that is left is to combine the two sections of the compose file and run docker-compose up -d.
---
version: "3.3"
services:
  wireguard:
    image: ghcr.io/linuxserver/wireguard
    container_name: wireguard
    cap_add:
      - NET_ADMIN
      - SYS_MODULE
    environment:
      - PUID=1000
      - PGID=1000
      - TZ=Europe/Berlin
      - SERVERURL=my.very-own.url.org
      - SERVERPORT=51820
      - PEERS=5
      - PEERDNS=auto
      - INTERNAL_SUBNET=10.13.13.0
      - ALLOWEDIPS=10.13.13.0/24
    volumes:
      - /home/jonathan/wireguard/config:/config
      - /lib/modules:/lib/modules
    ports:
      - 51820:51820/udp
    sysctls:
      - net.ipv4.conf.all.src_valid_mark=1
    restart: unless-stopped

  restic-backup:
    depends_on:
      - wireguard
    container_name: restic-backup
    build:
      context: .
      dockerfile: Dockerfile
    secrets:
      - user_ssh_key
    environment:
      - RESTIC_REPOSITORY=sftp:jonathan@10.13.13.2:/data/backup/server
      - RESTIC_KEY_HINT=backup_probe_key
      - BACKUP_CRON= 0 12 2-30/2 * *
      - RESTIC_FORGET_ARGS=--keep-last 2 --keep-monthly 3
    env_file:
      - .env
    volumes:
      - /zstorage/git:/data/git:ro
      - /home/jonathan/:/data/home:ro
      # ...
    restart: unless-stopped
    network_mode: service:wireguard

secrets:
  user_ssh_key:
    file: /home/jonathan/.ssh/backup_probe_key
Checking the Backup
Almost as important as creating a backup: Checking that you can restore from it. One way is, to mount the backup, so you can navigate it with a normal file manager:
> mkdir /tmp/restic
> restic -r sftp:jonathan@10.13.13.2:/data/backup/server mount /tmp/restic
After entering your RESTIC_PASSWORD, you should find your backup at /tmp/restic.
Happy Backuping!